Specifying Moderation Settings
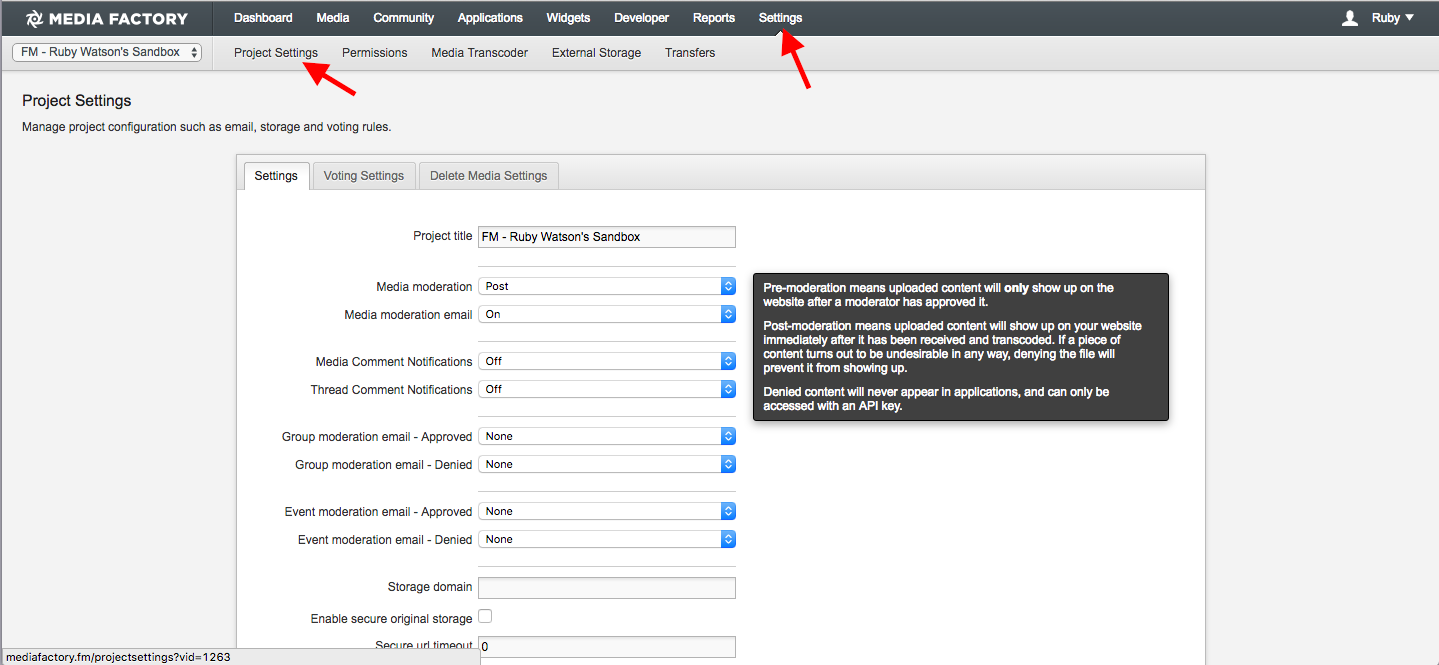
One of the first steps to take once your project has been set up is to specify Media Moderation settings, which define how you want to manage uploaded content
There are 2 main moderation settings settings to choose from:
-
Post-moderated: Uploaded media will be displayed on your website immediately after it has been received and transcoded by our system
-
Pre-moderated: Uploaded media will only show up on your website once it has been approved
Note: Denied content will never appear on your website
To specify Media Moderation settings:
-
In the top Navigation bar, go to Settings > Project Settings
-
From the Project Settings page, set your Media Moderation preference using the drop-down
-
Be sure to 'save' your preferences

Moderation Status
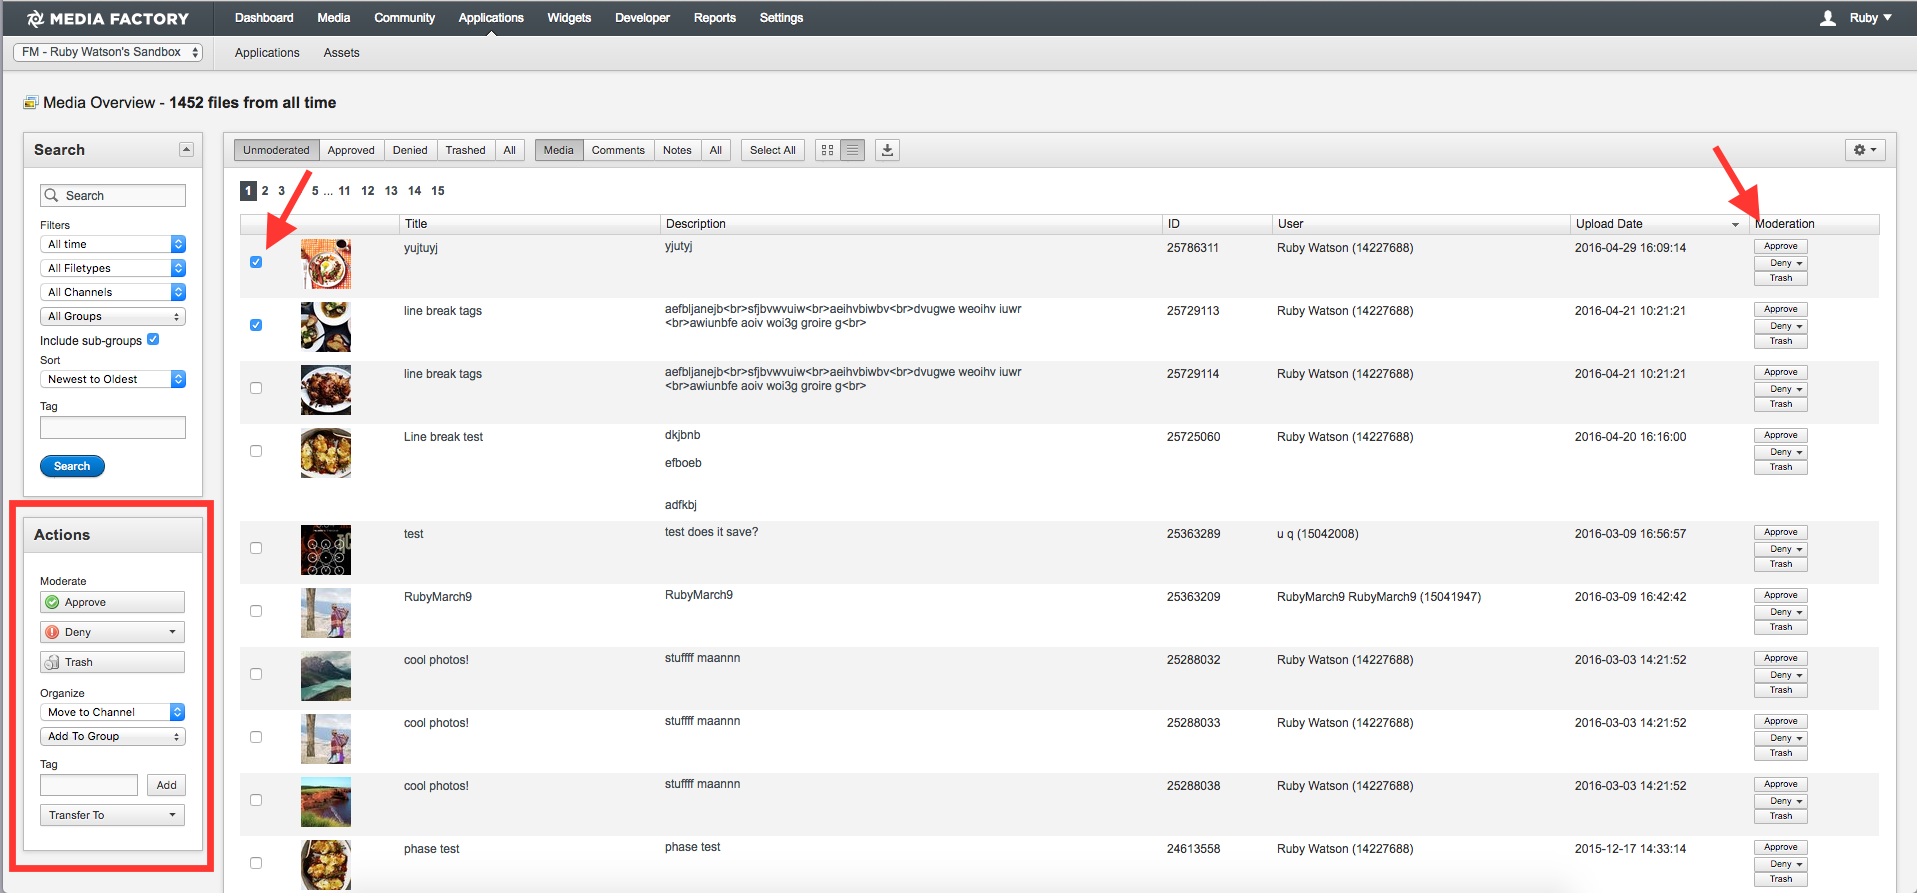
Any media uploaded by your front-end users will automatically arrive to the 'Unmoderated' folder on the Media Overview page. By default, the Media Overview page will load the 'Unmoderated' section to make it easy for you to see which content still needs to be approved, denied or trashed.
You'll notice the Media Overview page is organized according moderation status
-
Unmoderated: When media is first uploaded it appears in the Unmoderated category. From here, you can choose to approve, deny or trash it
-
Approved: When media has been approved it appears in this category. From here, you can deny or trash the media. Approved media appears on your website
-
Denied: When media has been denied it appears in this group. From here, you can approve or trash the media. Denied media does not appear on your website. Email can be sent to the person who uploaded the media to inform him or her that it has been denied and will not appear on the website
In addition to moderating media, you have the option of trashing and deleting it.
-
Trashed: When media has been trashed it appears in this category. From here, you can approve, delete or restore the media. If you restore it, it appears in the category to which it last belonged. For example, if you deny the media, then put it in trash, restoring it will put it back to the Denied group
-
Delete: If you delete media, it is permanently removed from the project and will no longer be accessible
Note: New Spark Platform gathers statistics related to media that is approved or denied. This is not the case with media that is trashed or deleted
Moderating Content Using Thumbnail View:
-
In the Navigation bar, select Media
-
On the Media Overview page, click the thumbnail view icon with the 4 small squares
-
Click on any thumbnail, or hold down shift to select multiple thumbs to activate the 'Actions' menu so that it can be moderated
Note: You can view the media as individual thumbnail icons  or as a list view
Note: Depending on the moderation category you are viewing, certain buttons may not appear under Actions. For example, the Delete and Restore buttons only appear when viewing Trashed media. Also, the buttons that appear under Actions refresh after you select media

Moderating Content Using List View:
-
In the Navigation bar, select Media
-
On the Media Overview page, click the List view icon with the horizontal lines
-
Check the box to the left of the items you wish to moderate

Moderating Content from Media Details Page:
Double click any individual media item to get to the details page and view stats or meta data about a specific entry:
-
In the Navigation bar, Select Media
-
Double-click the media for which you want to view meta data and stats
-
On the Media Details page, along the right-hand side, you can view information related to the selected item. On the left menu, you can moderate

Note: If you deny content from this page, you can select a reason from a drop-down list
When you are finished, click the Back to Media Overview button
Moderation Status Codes for API
Almost any media-based data payload will include the moderation status of the media in question.
|
Standard |
Media status |
Description |
|
unmoderated |
0 |
Unmoderated content |
|
approved |
1 |
Approved content |
|
denied |
2 |
Denied content |
![]() or as a list view
or as a list view ![]()

